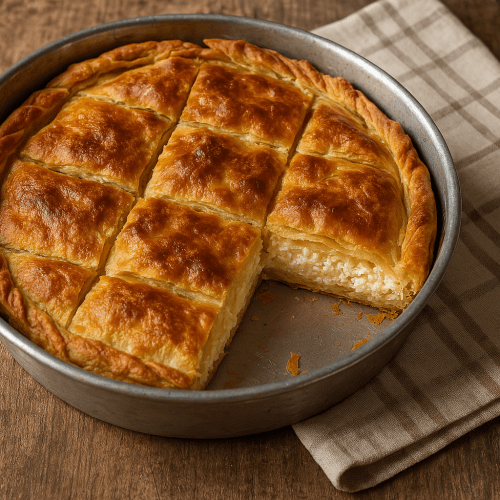
Part 1: Mastering the Dough & Handmade PhylloThe Art of Handmade Phyllo PiesA traditional Greek Handmade Pie is a labor of love, crafted with simple yet carefully chosen ingredients, meticulous technique, and time-honored skill.  The process of making a homemade phyllo pie follows these essential steps:
1. Choosing the Right Phyllo for Your PieDifferent types of Classic Greek Handmade Pies require distinct phyllo styles in terms of layering and texture. Each region of Greece has its own unique traditions and techniques when it comes to handmade phyllo and pie-making. Northern Greece: Macedonia & Epirus
Thessaly: The Land of Layered PiesThessalian pies are known for their multi-layered phyllo, often rolled into seven or nine sheets for an airy, crisp structure.
Central Greece (Sterea Ellada): Rustic & Flavorful PiesSterea Ellada’s pies are sturdy and rustic, often baked in wood-fired ovens for a deep, smoky flavor.
Peloponnese: Hearty & Traditional PiesPeloponnesian pies are rich and filling, often made with thick phyllo layers brushed with olive oil.
Crete: Rustic & Earthy PiesCretan pies often use whole wheat phyllo, rolled by hand and baked in wood ovens.
Aegean Islands: Coastal & Unique PiesIsland-style pies tend to feature soft, chewy phyllo, perfect for seafood-based fillings.
Ionian Islands: Buttery & Flaky PiesThe Ionian islands favor flaky, buttery phyllo, ideal for savory pies.
Each region’s phyllo-making techniques reflect local ingredients and baking traditions, proving that handmade pies are a true expression of Greece’s culinary diversity. Traditional Handmade PhylloThe heart of Greek baking, homemade traditional phyllo boasts an array of regional variations, appearing in everything from savory cheese pies to sweet pumpkin pies and delicate milk custard tarts. Crafted from hard wheat flour, water, olive oil, and vinegar, this phyllo requires skillful handling and patience to perfect. Its preparation is an art—rolling it out smoothly takes practice, but the reward is an exquisitely crisp, flavorful crust. Puff Pastry-Style Phyllo (Macedonian)A versatile and forgiving pastry, handmade puff phyllo is perfect for transforming simple ingredients into delicious, golden pies fit for any occasion. The secret lies in butter, generously incorporated throughout its preparation, lending a luxurious, melt-in-your-mouth flavor. Its distinctive lightness and crisp texture come from the lamination process, where layers of butter are folded within the dough. As the pastry bakes, the butter melts, the moisture evaporates as steam, and the layers separate, creating the signature airy, flaky structure. Puff pastry phyllo is a fantastic choice for both sweet and savory pies. 2. Selecting high-quality ingredientsSelecting the FlourA high-protein hard wheat flour is ideal for structure and elasticity, though all-purpose or self-rising flour can also be used. Traditional country-style flour has a coarser texture, making it slightly more challenging to work with. To enhance depth of flavor and aroma, consider blending flours at a 1:3 ratio, incorporating rye, barley, oats, cornmeal, or whole wheat. Sifting the flour ensures a light, delicate dough that rolls out effortlessly. Key Additions for Texture and Flavor
Flour-to-Water RatioA good guideline is 1:2—for example, 1.000 grams of flour absorbs about 500ml of water, though exact amounts vary based on flour type and humidity. The water should be lukewarm (around 35°C), helping to integrate ingredients smoothly, particularly when kneading by hand. 3. Mixing the dough componentsThe key to crisp phyllo is allowing olive oil to fully absorb into the flour. Ideally, drizzle the oil over the flour, rub it between your palms, and let it sit before kneading. The more time the flour has to absorb the fat, the flakier the final product will be. 4. Kneading the dough to develop textureKnead in a large bowl until the sides come clean. The dough should be pliable and smooth, detaching from the fingers yet remaining soft. Avoid adding excess flour prematurely—instead, knead longer, allowing the flour to gradually absorb the liquid. If the dough feels sticky, a little extra kneading will refine its texture. Incorporating stretching and folding techniques enhances elasticity and lightness. Avoid excessive kneading, as it can make the dough tough. Aim for 12-15 minutes of hand-kneading for the ideal texture. 5. Allowing the dough to rest and matureOnce the dough is smooth and supple, transfer it to a clean bowl, covering it with a damp cloth. Resting allows the gluten network to develop, making the dough strong, elastic, and easy to roll out. At room temperature: Rest for at least 1 hour. In the refrigerator: Rest for up to 3 days. Rested dough does not rise, as it contains no leavening agents. Instead, the gluten structure strengthens, creating a resilient, easy-to-roll sheet. A well-rested dough will roll out effortlessly, without shrinking or tearing. The difference is remarkable—it transforms into a smooth, stretchable sheet.
6. Dividing the dough into portionsOnce fully rested, divide the dough into portions as needed per recipe. Shape each piece into a round ball and place it on a lightly dusted surface. Sprinkle with a light coating of cornstarch, cover, and let rest for 15-30 minutes before rolling. If dough resists stretching, shrinks, or tears, it was not properly rested—give it additional time before attempting to roll. A fully rested dough rolls out seamlessly, resulting in light, crisp pies with an irresistible texture.
Stay tuned for Part 2, where we explore the art of rolling the dough and crafting the phyllo sheets, layering, filling choices, to achieve a stunning, authentic Greek pie! |


